CCAvenue Payment Gateway Integration in PHP Website With Step by Step Example
CCAvenue is the most popular payment gateway in India. As the eCommerce is picking momentum and growing at exponential rate, it is high time you think about setting up a shopping cart. If you are based out of India then CCAvenue is one among the best choice.
In a previous articles we have seen different payment gateway integration like PayPal, Stripe payment and more. Also, we have seen secured payment gateway method via PayPal Express Checkout, Authorize.net payment gateway integration.
In PHP, the CCAvenue payment gateway Integration can be made by binding the web application with CCAvenue using the client library. The library files will connect the CCAvenue server during payment with the reference of the authentication credentials. These credentials are available from the CCAvenue dashboard by logging in as a merchant.

CCAvenue provides resources like integration kit to tie up your application with the CCAvenue. This has to be downloaded from the dashboard and included into the PHP application to generate the payment API calls.
In this article, we will see the prerequisites and the steps to integrate CCAvenue payment gateway in PHP. A simple and lightweight example code explained in this tutorial will guide you to enable CCAvenue payment for your application by yourself.
What is a payment gateway?
The payment gateway is a (software) functionality to make an application to process online payments via credit cards, debit cards, net banking and more. The payment gateway providers will authenticate the application with the reference of the authentication credentials provided by them.
These credentials and the methods to get the credentials vary based on the payment gateway providers. For example, in CCAvenue payment gateway integration, the merchant has to be registered to get the API keys.
Introduction about CCAvenue payment gateway
The CCAvenue is known as Common Service Provider. Master Merchant allows authorized Sub Merchants to accept payment from their customers. The Master Merchant has to be authorized with CCAvenue to make a commercial web application to process payment.
CCAvenue Payment gateway Integration is similar to other payment gateway method like PayPal, Stripe and more in terms of process flow. Integrating this payment gateway with a web application is used to enable payment processing via CCAvenue. Previously, we have seen example code in PHP to integrate Stripe payment gateway.
This is one of the popularly used payment gateway for the Indian web applications. It supports online payments via credit card, debit card, internet banking and more.
If you want the PHP code for other payment gateway integrations like Authorize.net, Sage Pay payment then the linked article will be helpful for you.
Advantages of using CCAvenue payment gateway
There are many advantages of using this payment gateway method.
- It is one of the secured payment gateway which promises a protected payment cycle with your application.
- CCAvenue supports most of the eBusinesses regardless of its size.
- This type of payment gateway provides high level SSL encryption other security certifications.
- It promises secured link between customers, CCAvenue payment gateway, application, financial mediates during the payment flow.
CCAvenue payment gateway integration methods
There are four type of integration methods supported by CCAvenue to provide payment interface to collect information. Those are listed and explained below.
- CCAvenue billing page – A customizable billing page is provided by CCAvenue with an interface to collect billing and shipping information from the user.
- CCAvenue iFrame checkout – A predefined form used to get and validate the payment data from the user. This methods handles PCI compliance.
- Custom checkout form – Using this method the Merchant has to get and send the payment information to CCAvenue via a custom built form.
- CCAvenue shopping cart – CCAvenue supports product management and shopping cart customization. This will save the your effort to create and manage product and cart by your own.
CCAvenue payment flow diagram
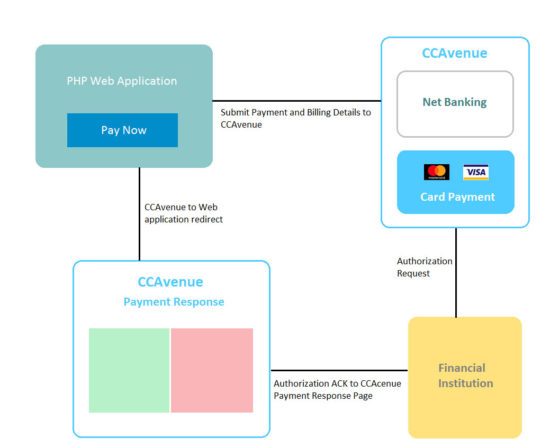
In this flow diagram, it displays the payment flow between CCAvenue and the PHP web application in which this payment gateway is integrated.
In this flow diagram, it shows the possible ways of payments supported by CCAvenue. As we have already seen, it supports net banking, credit / debit card payments as shown in the figure.
Steps to integrate CCAvenue Payment Gateway
These are the steps required for the CCAvenue payment gateway integration in PHP.
- Create Merchant Account.
- Login to Merchant Dashboard and download CCAvenue payment integration kit.
- get Security keys (Merchant id, Access Code, Working key).
- Configure CCAvenue security keys and (test/live) endpoint in your PHP application.
- Create Payment form and deploy request / response handlers and with the guidance of the integration kit.
- Create return pages for handling payment notification on success or cancel.
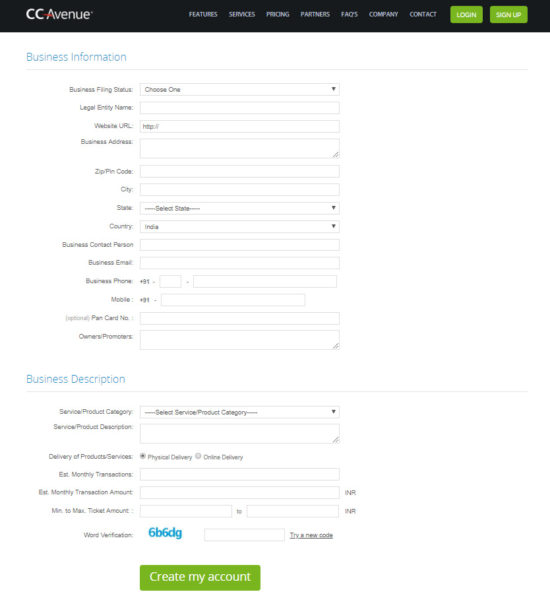
The following screenshot shows the CCAvenue merchant signup form used to create a new account as the first step of this payment integration.
Download CCAvenue payment gateway integration kit
The CCAvenue payment gateway integration kit is client library provided by CCAvenue. This integration kit is available for mobile and web application.
CCAvenue provides the integration kit for many programming environment PHP, Python, ASP.Net and more.
By logging in with the approved Merchant account we can see the menu navigation in the header to see the integration kit downloads. After login, navigate through Resources > Web Integration Kit > Download Integration Kit > Download PHP to get the integration kit for the PHP.
When you download the integration kit from the CCAvenue merchant dashboard, it contains request response payment handler files. The integration kit is also contains Crypto.php with the collection of functions to to encrypt decrypt merchant data.
How to get the CCAvenue Merchant ID, Access Code and Working Key
Fore implementing CCAvenue payment gateway integration, the merchant id, access code and the working key are the prime information to be passed with the payment request. For getting these code and keys you need to have CCAvenue Merchant account.
Once we logged in with CCAvenue by using Merchant account, we can see the dashboard with menu options access the resources and keys.
By navigating via Settings > API keys the CCavenue API keys page will be shown. This page will display the Merchant Id, Access Code and Working key.
The list of Access Code and Working keys are shown for the corresponding registered URLs. So, we need to copy the right secret keys and use them in the right origin to send payment request.
Payment gateway PHP example integration with a website
In this section, we are going to see an example for integrating CCavenue payment gateway in an PHP application.
Configure the Merchant id, Access Code and Working key with your PHP application. In this example, I have created config.php file to contain these security keys used for payment initiation and processing.
In the PHP payment integration kit downloaded from the CCAvenue resources has the ccavRequestHandler.php, ccavResponseHandler.php, Crypto.php and a test file which contains the sample payment form with required inputs.
CCAvenue Payment Form HTML
A standard payment form has to be submitted for initiating the payment request. This form will contain inputs with merchant id, language, amount, currency and more payment details. It also contains customer’s billing information with name and address.
The following HTML shows the sample payment form used in this PHP CCAvenue payment gateway integration example. The form action is pointed to the PHP endpoint ccavRequestHandler.php to which the payment details will be posted.
php
require_once "config.php";
?>


CCAvenue Payment Gateway Intgration
id="ccav-payment-form">
ccavRequestHandler.php
In this file, it receives the payment data posted via the HTML form. The posted data are are encrypted in this file. The working key taken from the CCAvenue Merchant dashboard is used as the encryption key.
After encrypting these form input the encrypted details are concatenated and sent to the CCAvenue server with the access code.
The following script shows how it is going to be implemented in the ccavRequestHandler.php file. This code points the CCAvenue test environment for testing the payment flow initially.
</span><span class="pln" style="color: rgb(77, 77, 76);"> CCAvenue Payment Gateway Integration kit</span><span class="tag" style="color: rgb(200, 40, 41);">
Crypto.php
This file contains the functions to encrypt or decrypt the payment information posted via the HTML form. It also includes util functions for padding and conversion.
php
error_reporting(0);

function encrypt($plainText, $key)
{
    $secretKey = hextobin(md5($key));
    $initVector = pack("C*", 0x00, 0x01, 0x02, 0x03, 0x04, 0x05, 0x06, 0x07, 0x08, 0x09, 0x0a, 0x0b, 0x0c, 0x0d, 0x0e, 0x0f);
    $openMode = mcrypt_module_open(MCRYPT_RIJNDAEL_128, '', 'cbc', '');
    $blockSize = mcrypt_get_block_size(MCRYPT_RIJNDAEL_128, 'cbc');
    $plainPad = pkcs5_pad($plainText, $blockSize);
    if (mcrypt_generic_init($openMode, $secretKey, $initVector) != - 1) {
        $encryptedText = mcrypt_generic($openMode, $plainPad);
        mcrypt_generic_deinit($openMode);
    }
    return bin2hex($encryptedText);
}

function decrypt($encryptedText, $key)
{
    $secretKey = hextobin(md5($key));
    $initVector = pack("C*", 0x00, 0x01, 0x02, 0x03, 0x04, 0x05, 0x06, 0x07, 0x08, 0x09, 0x0a, 0x0b, 0x0c, 0x0d, 0x0e, 0x0f);
    $encryptedText = hextobin($encryptedText);
    $openMode = mcrypt_module_open(MCRYPT_RIJNDAEL_128, '', 'cbc', '');
    mcrypt_generic_init($openMode, $secretKey, $initVector);
    $decryptedText = mdecrypt_generic($openMode, $encryptedText);
    $decryptedText = rtrim($decryptedText, "\0");
    mcrypt_generic_deinit($openMode);
    return $decryptedText;
}

// *********** Padding Function *********************
function pkcs5_pad($plainText, $blockSize)
{
    $pad = $blockSize - (strlen($plainText) % $blockSize);
    return $plainText . str_repeat(chr($pad), $pad);
}

// ********** Hexadecimal to Binary function for php 4.0 version ********
function hextobin($hexString)
{
    $length = strlen($hexString);
    $binString = "";
    $count = 0;
    while ($count < $length) {
        $subString = substr($hexString, $count, 2);
        $packedString = pack("H*", $subString);
        if ($count == 0) {
            $binString = $packedString;
        }
        else {
            $binString .= $packedString;
        }

        $count += 2;
    }
    return $binString;
}
?>
Note: This file uses the deprecated function mcrypt_ function. These functions are deprecated as of PHP version 5.5.0 and it will not work in PHP 7. If you want a alternate for the encrypt decrypt utilities to be supported in latest PHP version, the following code will be helpful.
php
function encrypt($plainText,$key)
{
    $secretKey = hextobin(md5($key));
    $initVector = pack("C*", 0x00, 0x01, 0x02, 0x03, 0x04, 0x05, 0x06, 0x07, 0x08, 0x09, 0x0a, 0x0b, 0x0c, 0x0d, 0x0e, 0x0f);
    $encryptedText = openssl_encrypt($plainText, "AES-128-CBC", $secretKey, OPENSSL_RAW_DATA, $initVector);
    $encryptedText = bin2hex($encryptedText);
    return $encryptedText;
}

function decrypt($encryptedText,$key)
{
    $secretKey         = hextobin(md5($key));
    $initVector         =  pack("C*", 0x00, 0x01, 0x02, 0x03, 0x04, 0x05, 0x06, 0x07, 0x08, 0x09, 0x0a, 0x0b, 0x0c, 0x0d, 0x0e, 0x0f);
    $encryptedText      = hextobin($encryptedText);
    $decryptedText         =  openssl_decrypt($encryptedText,"AES-128-CBC", $secretKey, OPENSSL_RAW_DATA, $initVector);
    return $decryptedText;
}
...
...
?>
CCAvenue test environment
Once this payment gateway integration is completed, the code must be tested in the sandbox environment. CCAvenue provides a test environment to test the payment flow before put the application in production.
In the CCAvenue test environment the payment transactions will not be processed. This is the sandbox mode of testing the payment request and response flow.
The example code in this article targets the test environment URL in the payment form action attribute.
Go Live
After testing the CCAvenue payment gateway integration with the PHP application, you can go live by moving it to the production.
For going live and use the CCAvenue secure production environment, the https://test.ccavenue.com target should be replaced with https://secure.ccavenue.com.
CCAvenue payment form output
For initiating the CCavenue payment request, we need to build the standard payment form for your PHP application. This form should contain payment details like payment callback URLs, amount, currency, item number and more information.
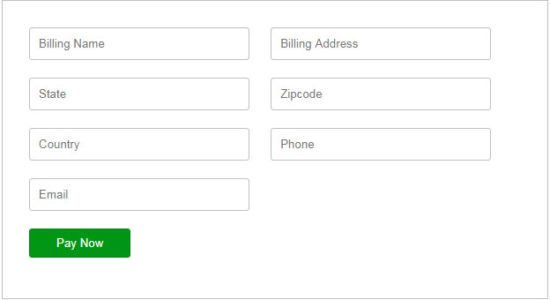
Below screenshot shows the CCAvenue payment form fields to collect the billing information from the user. The other payment details like the notify URL, return URL are sent via form’s hidden fields.

Conclusion
As a popularly used payment gateway method, it provides great support for it sub merchants and thereby facilitate consumers with protected payment environment. Most of the Indian applications use CCAvenue as a payment gateway for providing options to its customer to make payments.
With the clear integration procedure, the CCAvenue API simplifies the developers effort on payment gateway integration with the PHP application. It supports the integration kit not only for PHP but also for many platform like .Net, Python, iOS and more.
Hope this article helps you to understand how to integrate CCAvenue Payment gateway with a PHP web application. The downloadable source code contains the sample payment form code with the CCAvenue payment request and response handlers. For running this example, you need to create a Merchant account in CCAvenue and replace the configurable API key constants in this example.
If you looking for the PHP code to implement recurring payment, one of the previous articles will be helpful for you. Previously, we have seen about how to manage recurring payment using PayPal Subscriptions and also to manage recurring payments with Stripe Billing method.

